As you enter our home, there is a large two-story foyer, raised dining room and stairs leading to the second story landing where you will find two guest bedrooms with en suite bathrooms.
Finishing the remodel of the foyer involved many of these areas because they are connected. We started from the floor up.
Replacing the flooring throughout the first floor.
Remodeling the dining room just off the foyer.
Remodeling the staircase and second floor landing.
Before we started removing the floor tiles, we removed all the mirrors in the house – there were two rooms with complete mirrored walls, the dining room and an exercise room off the kitchen that would become our office. The fireplace had a mirror that went up 20 feet and the bathrooms had mirrors covering walls above the sinks. We started in the dining room.
 |
| They managed to remove all the mirrors throughout the house without breaking any of them. |
 |
| After the mirrors were off the wall in the dining room, our dry wall company had to come in and remove the glue. (Note the old light fixture in this photo.) The wall required a complete layer of new mud and texture. It was an unexpected job. One of those "unexpected consequences." LOL |
 |
| Next the old floors came out. |
 |
| Some of the floor tiles came up in big sheets. It was an easy job to remove the tiles. |
Removing the tiles was one of the messiest parts of the entire project but also one of the fastest. The tiles were loose and came up very easily. They were done with the entire lower level of the house in under 4 hours.
We loved the new floors from the first moment they started laying the new tiles.
 |
| The new tiles were fabulous. |
 |
| Next new LED lights were installed in the recess of the dining room ceiling. |
 |
| We took down the old light and medallion. |
 |
| And put up the new light. |
 |
| After the cabinet bases were built across the back wall, we had the granite installed. It is a beautiful navy blue color. |
 |
| Finally the cabinets were finished by our custom cabinet maker, GM. |
The iron-railing staircase took the longest to complete of any of the projects in the house, three full months. They were possibly the most complex project and definitely the most artistic. JP was our carpenter for the stairs. He is a true artist.
The original staircase reminded me of a deck rail, all wood. The stairs were covered in carpeting and there were plastic green plants on ledges everywhere.
 |
| I had bags and bags of green plastic plants. |
The stairs were first removed and then built back one part at a time. It was quite a process.
After the old white posts and rails were removed, the holes were filled. Then our staircase carpenter, JP began work on the new hand rail. First it was glued, curved and cut into pieces. Then the treads were cut and placed. After all the wood was in place, it was stained and sealed. Finally after the wood was stained, JP came back and put all the iron in place and secured it. Whew!
I saved a small cross section of the railing so I could remember how complex the process was. I keep it on a shelf in the office.
JP's first step was to cut the layers of railing to correct lengths. He then glued the layers together and clamped them in place so they would dry with the exact curve of our staircase. It was a long and labor-intensive process.
 |
| Work was done one rail at a time. |
 |
| I was very impressed with JP's clamping process. It allowed him to match the curve angle of our stairs. Each rail was a different angle and it took a long time for him to get it just right. |
The clamps were actually visually interesting when they were in place. One day I took an entire series of photos of just the clamps.
When the rails were bent and in place, they were sanded - sanded and sanded again.
Our cabinet maker, GM did the staining of the rails, treads and the front door. They all match. Again, this was a multi layer process.
 |
| For several days, the entire foyer was sealed off with plastic. |
 |
| Each tread and rail had 4 layers of stain and sealer. |
After the staining was complete, JP started inserting the iron rails.
 |
| JP and I did a lot of "on site" design decisions. Here he is using his head and all of his fingers to hold rails so we can decide on the configuration of the final landing at the bottom of the staircase. |
|
We tried several configurations before deciding on the design of the landing above the foyer.
|
| The landing at the top of the stairs looks out over the living room as well as the foyer. The railing on the living room side was easy. JP might not say it was easy but compared to the other work, to me it looked easy. LOL |
 |
| The curved iron post in our stair design is called "Nautilus." I think it is ironic because I love the ocean so much. I did not know that was the name of the design until JP told me. |
 |
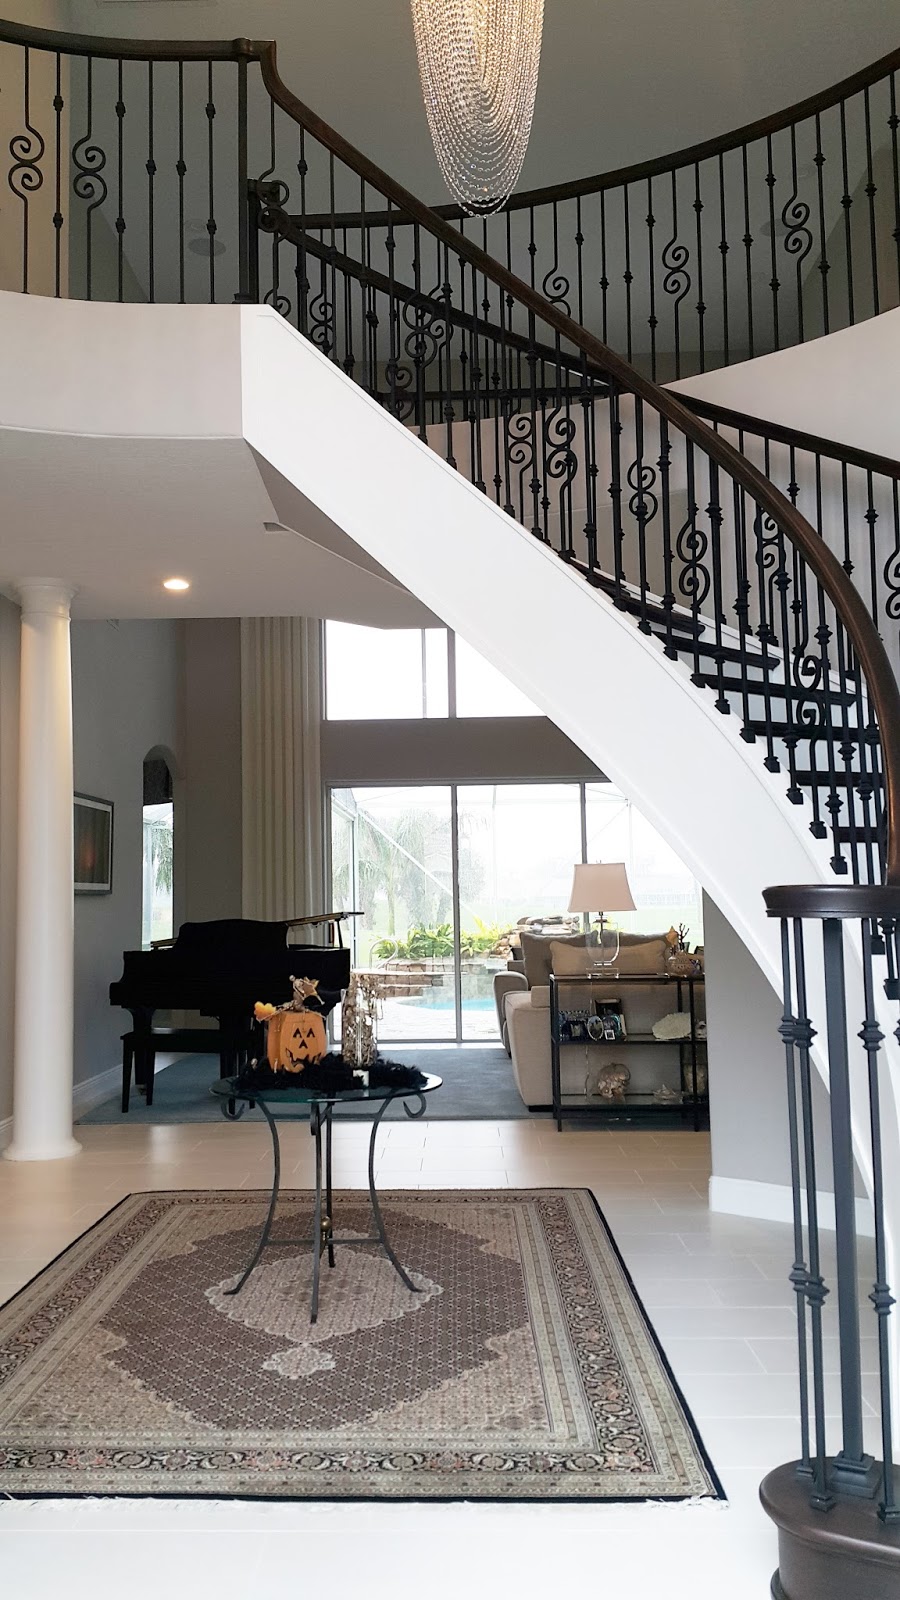
| The finished stairs are beautiful and very dramatic. |
After the stairs were complete, it was time to have the light fixture changed. The original fixture was plastic made to look like crystal. We almost kept it as the style has made a comeback recently. In the end we decided to replace with some real crystal and we are very happy we did.
 |
| The light arrived in a large crate. |
 |
| Once hung, it really is beautiful. |
The foyer, dining room and staircase were some of the most difficult work in the entire house. However the impact as you walk in the front door is exactly what we wanted. It really is stunning.
 |
| Dining room BEFORE |
 |
| Dining room AFTER |
Many people say they don't want a formal dining room. I realize the current trend is to only have one "eating" area however I personally love having a formal dining room. I just feel it makes those special dining opportunities more elegant and memorable. We do try to use our dining room often and it is very enjoyable. The wine coolers also come in handy.
 |
| Dining room cabinets along the wall also have wine cabinets on each end. |
The finished foyer is really wonderful. It is dramatic and still fun. The table in the center can change with the seasons giving me a place to be creative. The doors are the perfect size for pretty wreaths so the whole area is quite fun. Some of these photos were taken with Halloween decorations.
 |
| Foyer BEFORE |
 |
| Foyer AFTER |
 |
| The stairs are wonderful and we are very pleased with the effect. |
 |
| The chandelier also shines! |
 |
| Two of our rugs from the Middle East look really nice in the foyer. |
 |
| At night the crystals in the foyer light twinkle. |
So far everything was coming out the way we had hoped. And, to make it even better, we were still having fun!
Cheers,
Brenda